Cleaning hearing aid using a brush

Maintenance

Guide to hearing aid care & maintenance

Learn how to do basic hearing aid maintenance with Miracle-Ear to extend device life.

Why hearing aid care matters

Proper care is essential to maintain the performance, hygiene, and longevity of your hearing aids. This guide brings together expert insights from leading audiology sources to provide a complete overview of daily routines, style-specific care, and professional support. Hearing aids are exposed daily to heat, moisture, and earwax, which can corrode internal components, diminish sound quality, and shorten lifespan. Regular maintenance helps prevent costly repairs, enhances device longevity, and ensures optimal hearing performance.

Dr. Tom Tedeschi

This content was approved by:

Dr. Thomas Tedeschi, Au.D.

Chief Audiology Officer, Miracle-Ear

Do hearing aids require maintenance?

Hearing aids require regular maintenance to function properly and last longer. Hearing aids are exposed to moisture, earwax, and debris every day. Without consistent care, this exposure can damage internal components, reduce sound quality, and lead to malfunctions.

How do you maintain a hearing aid?

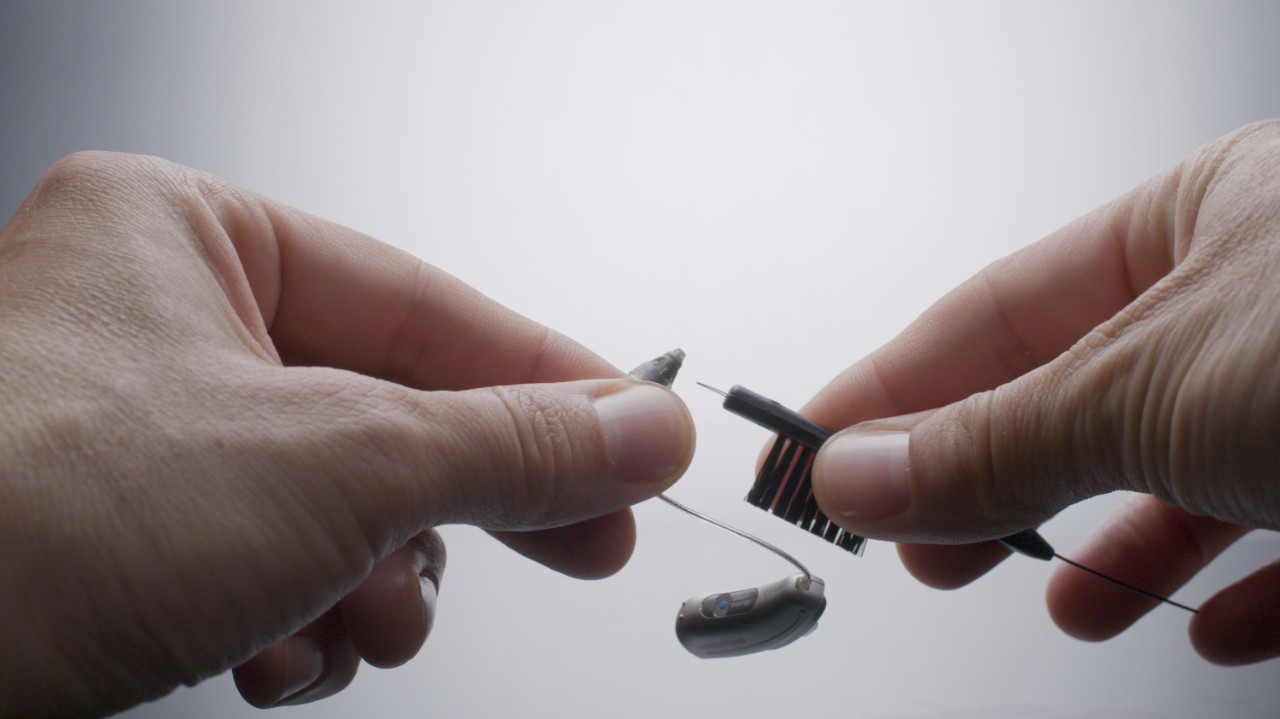
Daily maintenance includes wiping the hearing aids with a soft, dry cloth and gently brushing the microphone and receiver areas to remove debris. On a weekly basis, users should check and replace wax guards if required, clean or change domes, and inspect earmolds or tubing for buildup or wear.

Storage also plays a key role. Hearing aids should be kept in a clean, dry space—ideally in a dehumidifying box. Battery doors should be left open overnight to prevent moisture buildup. Rechargeable models should be kept clean and dry in their chargers.

Hearing aids should not be exposed to water, extreme temperatures, or products like hair spray. Battery care is also essential: replace or recharge as needed and clean battery contacts regularly.

Experts recommend professional cleaning and check-ups every 4–6 months, which are included at no cost with Miracle-Ear's free lifetime aftercare. Your Hearing Care Professional can remove deep wax, inspect components, and ensure proper function. Together, daily care and periodic servicing help preserve performance and prevent costly repairs.

What is the 5 minute rule for hearing aids?

The “5 Minute Rule” for hearing aids refers to allowing a newly uncovered zinc-air battery to breathe before inserting it—an easy tip that can significantly extend its lifespan. Hearing aid batteries operate using zinc-air chemistry, which activates when oxygen enters the cell. After peeling off the protective tab, the battery immediately begins draining power as it reacts with the air. By waiting approximately five minutes before inserting the battery into your device, you allow it to fully activateresulting in notably longer life.

This technique was popularized by an award-winning experiment conducted by an eighth-grader, Ethan Manuell. His tests showed that waiting five minutes before insertion can extend battery life by 2–3 days—an impressive 80% increase for many users. The American Speech-Language-Hearing Association also noted that the 5 minute wait can yield an extra two or three days of use.

To optimize battery performance, purchase fresh batteries, peel the tab only when ready to use, wait at least five minutes before inserting, and store them at room temperature. Combined with nightly habits like opening the battery door to reduce drain, the 5 Minute Rule is a simple but effective strategy to save time and money while maintaining reliable hearing support.

Miracle-Ear specialist shaking hands with patient

Ask our specialists

If questions come up when you're cleaning your hearing aids, know that you aren't on your own. If you have specific questions about how to clean hearing aids or what tools to use, ask your hearing care specialist. He or she will be able to ensure you’re getting the most out of the lifetime care and service* that comes with every Miracle-Ear hearing aid purchase.

How to care for hearing aids?

Regular cleaning and maintenance are essential. With just a few simple routines, you can reduce issues, prolong lifespan, and avoid costly repairs by keeping your hearing aids in top condition.

  • Everyday good habits

Handle hearing aids gently—especially delicate parts like microphones, receivers, and tubing. Store them on soft surfaces. Keep them dry: avoid water exposure, open battery doors overnight, and consider a dehumidifier if you live in humid conditions or sweat frequently.

  • Avoid extreme temperatures & risks

Heat and cold can damage electronics. Never leave your hearing aids in direct sun or near radiators; in cold weather, protect them (and your ears) by wearing a hat. Store your devices safely out of reach from children and pets, and keep them away from your laundry to prevent any mishaps.

  • Pay attention to trouble spots

BTE tubes and earmolds may harden, discolor, crack, or clog—typically requiring replacement every ~6 months.

Domes on RIC hearing aids should be checked monthly and replaced every ~3 months to prevent wax build up and receiver damage.

Wax guards protect receivers; replace them twice a year or when clogged. If a dome or guard falls off in the ear, seek professional removal promptly.

Batteries: leave compartments open at night. Disposable ones typically last 1–2 weeks; don’t let spent batteries sit. Rechargeable models hold ~24 hours and their lithium-ion battery capacity declines ~10–15% per year—consider replacing before warranty expiration.

Your toolkit should include a soft brush, wax pick/wire loop, multitool, cloth, and vent cleaner. Optional tools: soft-bristle toothbrush, alcohol-free wipes, and cleaning threaders for deep-clearance. Kits are available from providers or online (~$10–20).

  • Routine daily/weekly cleaning

Clean your aids several times weeklyor daily. Wash hands, hold aids over soft surfaces, turn them upside-down to dislodge debris, brush, wipe, and inspect domes and wax guards. Never use chemicals or sharp objects. Finish by storing them safely.

Find your closest Miracle-Ear center

Your store

The hearing aid maintenance checklist

  • Handle your hearing aids with care

Even though most modern hearing aids are built to be durable, they still require a secure grip during handling, insertion, removal, and cleaning to avoid drops. When setting them down, place them on soft, clean surfaces like a towel.

  • Don’t immerse your hearing aid in water

Despite being moisture-resistant, hearing aids should not be worn while showering, swimming, or bathing. Avoid cleaning with water. Immersion in water can cause serious damage to internal components. If they get wet, gently pat them dry — never use heat sources like hairdryers, as it may warp the device.

  • Store your hearing aids in a safe, dry space

When not in use (typically at night), store hearing aids in a clean, dry place. In humid environments, consider a hearing-aid dehumidifier. Leave the battery doors open to allow moisture to escape. Store them securely, especially if children or pets are around.

  • Regularly clean off earwax and replace the wax filter

Daily exposure to earwax can degrade performance, so it’s recommended to clean hearing aids at the end of each day using a dry cotton swab or soft toothbrush—focusing on the receiver and microphone areas. Replace wax filters whenever buildup is evident, using the correct filter type.

  • Take care of the batteries and change them frequently

Moisture can corrode batteries, so leave battery doors open when not in use and remove batteries if the aids won't be worn for several days. Replace batteries regularly and clean contacts with a dry swab. Users often develop a routine based on typical battery life.

  • Schedule professional cleanings

Home upkeep is crucial, but it’s equally important to have your hearing aids professionally cleaned and inspected every 4–6 months. Professionals can identify damage and adjust settings as needed.

Hearing aid maintenance tips for beginners

Daily handling should be done with care—preferably over a soft surface to prevent damage from drops. Hearing aids should always be kept dry: open the battery doors overnight and use a dehumidifier, especially in humid environments or after physical activity.

Avoid exposing devices to extreme temperatures. Direct sunlight, heaters, and freezing conditions can damage internal electronics. Store your aids in a safe, dry place.

Key maintenance areas include:

  • BTE tubing and earmolds, which can harden or clog, should be replaced every six months.
  • RIC domes should be checked monthly and typically replaced every three months.
  • Wax guards protect internal parts and should be replaced when clogged or every six months.
  • Batteries (disposable and rechargeable) require regular checks. Rechargeables should be monitored for capacity decline and replaced before warranty expiration.

Recommended tools include a soft brush, wax pick, dry cloth, vent cleaner, alcohol-free wipes, and (for BTEs) a tubing blower. Cleaning kits are widely available for $10–20.

Daily cleaning involves wiping and brushing to remove wax and debris. Weekly routines should include deeper cleaning of vents and ports, along with checking and replacing consumables.

Cleaning varies by device:

  • BTEs: Clean tubing and earmolds with soap and water, then dry thoroughly.
  • RICs: Focus on domes and wax guards.
  • ITEs: Clean microphones and vents carefully with a brush and dry cloth.
  • Over-the-counter (OTC) hearing aids require similar maintenance. Follow manufacturer guidelines and seek professional help when needed.

Finally, schedule regular check-ups every 6 to 12 months to allow your hearing care professional to clean internally, adjust settings, and replace parts professionally.

Capsule for cleaning hearing aids

Take care of your hearing aids

Keep your hearing aids performing at their best with simple daily care. Regular cleaning and proper storage can extend their lifespan and improve sound quality. Avoid common issues by learning the right maintenance techniques. Whether you're at home or on the go, a few easy habits make a big difference.

How to clean hearing aids properly?

Proper cleaning is essential to keep your hearing aids functioning effectively and lasting longer. Understanding how to clean a hearing aid the right way helps prevent sound blockages, moisture damage, and costly repairs.

Start by using a soft, dry cloth to wipe down the device daily. This removes surface oils and debris. Most experts recommend using a small brush or the tool provided by your audiologist or hearing care professional to gently clean the microphone and receiver areas. For deeper wax buildup, a wax pick or wire loop can be used carefully—avoiding any insertion into the ports.

The type of device affects the cleaning method. For in-the-ear (ITE) aids, brush and wipe the outer surface, and use a wax tool for vent openings. Behind-the-ear (BTE) models often have earmolds and tubing that can be detached and washed with warm, soapy water—then thoroughly dried before reattaching. Receiver-in-canal (RIC) aids require special attention to the domes and wax guards, which should be replaced as needed.

A high-quality hearing aid cleaner kit, which includes brushes, loops, and cloths, makes regular maintenance easier. Kits are available from your hearing care provide or online.

For best results, consider a professional hearing aid cleaning service every 4–6 months. Hearing care providers use specialized tools to vacuum out debris, inspect internal components, and check device performance.

Incorporating a consistent cleaning routine and knowing when to seek professional help ensures your devices continue to deliver clear, reliable sound every day.

How to clean hearing aids at home

Cleaning your hearing aids at home is simple and essential for keeping them in good working condition. Here’s how to clean hearing aids properly, based on expert guidance:

1. Wash and dry your hands

Always start with clean, dry hands to prevent transferring oils or moisture to your devices.

2. Wipe down the hearing aids

Use a soft, dry cloth to wipe the outer surface of your hearing aids each day. This removes oils, dust, and loose earwax.

3. Use a brush for microphones and receivers

Using a small, soft-bristled brush (often included in a hearing aid cleaner kit), gently clean around the microphone and receiver openings. Hold the aid with the ports facing downward so debris falls out, not in.

4. Remove wax with a loop or pick

Use a wax pick or wire loop to carefully remove visible earwax from vents or openings. Be gentle—never push anything into the hearing aid.

5. Clean or replace domes and wax guards

If your device has domes or wax guards, clean them regularly and replace them when they become discoloured, blocked, or misshapen.

6. Let them air out overnight

Open the battery door or place rechargeable models in their charger to dry overnight. Use a dehumidifying box if needed.

For deep cleaning and to avoid stubborn buildup, schedule a clean and check with your hearing care professional every 4–6 months.

Need help with your hearing aid?

Your store

How to clean hearing aids of wax and debris

Keeping your hearing aids clean and properly disinfected is key to maintaining clear sound, preventing damage, and ensuring good hygiene. Earwax, moisture, and debris can easily build up and impact performance. Following expert guidance, you can safely clean and disinfect your hearing aids at home.

  • Start by gathering your cleaning tools. A hearing aid cleaner kit usually includes a soft, dry cloth, a small brush, a wax pick or wire loop, and a vent cleaner. These cleaning tools can help remove wax and debris without harming sensitive components.
  • Hold the hearing aid with the microphone and receiver openings facing downward, then gently brush away loose particles. Use a wax pick to carefully remove stubborn wax from vents and crevices. Be gentle—avoid inserting tools deep into the device.
  • To disinfect, use a non-alcohol, hearing aid-safe wipe or spray. Apply the disinfectant to a cloth (never directly to the device) and gently wipe the surface. Avoid moisture entering any openings, and never use alcohol, peroxide, or household cleaners, which can damage electronics.
  • Inspect wax guards and domes regularly. Replace clogged wax guards as needed, and clean domes or earmolds with mild soapy water if removable. Allow them to dry completely before reattaching.
  • Finish by storing your hearing aids in a dry, clean case or a dehumidifying box. For thorough cleaning and disinfection, consider a professional hearing aid cleaning service every few months. This ensures all components are checked and maintained properly.
How to troubleshoot hearing aids problems

How to troubleshoot hearing aid problems

How to troubleshoot hearing aids problems

How to troubleshoot hearing aid problems

How often should hearing aids be cleaned

Hearing aids should be cleaned daily, with more thorough maintenance performed weekly.

  • Daily cleaning: Wipe your hearing aids each day with a soft, dry cloth to remove moisture, earwax, and oils. Use a soft brush to gently clean the microphone and receiver areas. This helps prevent wax buildup and keeps sound quality clear.
  • Weekly maintenance: Once a week, inspect the device more thoroughly. Use a wax pick or loop to remove any remaining debris from vents and openings. Check domes, wax guards, and earmolds for blockage or wear. Replace these parts as needed—typically every 1 to 3 months, depending on the style and personal wax production.
  • Professional cleaning: Experts recommend a professional hearing aid cleaning service every 4 to 6 months. Your hearing care professional uses specialized tools to deep-clean the internal components, can replace worn parts, and can ensure the device is functioning properly.

Consistent maintenance helps prevent common issues like muffled sound, feedback, or device failure. Keeping a routine ensures your hearing aids stay hygienic, comfortable, and working as intended.

Hearing aids maintenance according to types

Each type of hearing aid requires tailored care to ensure proper function and longevity. Whether you wear in-the-ear (ITE), in-the-canal (ITC), completely-in-canal (CIC), behind-the-ear (BTE), receiver-in-canal (RIC), or rechargeable hearing aids, proper maintenance routines help prevent damage from moisture, earwax, and debris.

  • ITE, ITC, and CIC hearing aids sit inside the ear and are more prone to earwax buildup. Use a soft brush or wax tool daily to clean around the microphone, vent, and especially the receiver. When learning how to clean the ITE receiver on a hearing aid, remember to brush with the device facing downward so debris falls away from the internal parts. Avoid using water, alcohol, or harsh cleaners.
  • BTE hearing aids rest behind the ear and connect to the ear canal via tubing and an earmold or dome. Clean the outer casing with a dry cloth and gently brush the microphone ports. Remove the earmold or tubing weekly and wash it with warm, soapy water. Rinse and dry thoroughly before reattaching.
  • RIC hearing aids, a subtype of BTE, have a small speaker (receiver) inside the ear canal. Clean the domes daily and replace them when clogged, discoloured, or deformed. Inspect and replace wax guards regularly.
  • Rechargeable hearing aids need special attention to their power system. To maintain rechargeable hearing aids, store them in their charger when not in use and avoid humidity or extreme temperatures. Knowing how to clean contacts on rechargeable hearing aids is key—wipe the contact points on both the device and the charger with a dry, lint-free cloth.

In all cases, professional hearing aid cleaning services every 4–6 months are recommended to ensure deep cleaning and optimal function.

Can you use baby wipes to clean hearing aids?

According to expert guidance, baby wipes often contain moisture, alcohol, oils, and fragrances which can damage the delicate electronic components of hearing aids. These ingredients may corrode the microphone, receiver, or battery contacts and introduce moisture into internal circuits—leading to malfunction or reduced performance.

For safe cleaning, use only:

  • A soft, dry cloth for daily wiping
  • A hearing aid brush or wax loop for removing earwax and debris
  • Hearing aid-specific disinfectant wipes (alcohol-free and non-moisturizing) if needed for hygiene purposes

If you want to disinfect your hearing aids, choose wipes or sprays specifically designed for hearing aids. Always apply sprays to a cloth—not directly on the device. Never use cleaning sprays or wipes on non-water resistant devices.

Proper storage in a dry case or dehumidifier, along with regular professional cleanings, helps keep your devices working safely and hygienically.

Hearing aid cleaning kits and brushes: tips

Hearing aid cleaning kits are essential for keeping your devices in good condition and ensuring clear, consistent sound. With the right tools and techniques, you can easily manage daily buildup and prevent long-term issues like wax blockages or moisture damage.

A typical hearing aid cleaning kit includes a soft-bristled brush, a wax pick or loop, a vent cleaner or tubing threader, and a soft, lint-free cloth. Some kits also feature a bulb blower for cleaning tubing in behind-the-ear (BTE) models or non-alcohol disinfectant wipes specifically designed for hearing aids.

One of the most important tools is the brush. Use it daily to gently clean the microphone and receiver areas. Always hold the hearing aid with the openings facing downward so any loosened debris falls away rather than into the device. Avoid pressing too hard, as this can damage sensitive components.

Wax picks or loops are best for weekly maintenance. These help remove stubborn wax from vent holes or receiver ports. Work slowly and carefully—never insert anything deep into the device.

To maintain hygiene, clean the tools themselves after each use and store them in a dry, clean place. Replace brushes regularly—typically every few months or when the bristles start to wear.

Avoid using household items like toothbrushes or metal objects, which can be too abrasive or sharp. For best results, combine at-home care with a professional hearing aid cleaning service every 4 to 6 months. This ensures your devices remain clear, functional, and comfortable to wear.

A woman wearing a hearing aid looking at the mirror

Need help with your hearing aids?

Consult with your Hearing Care Professional with any questions you may have along the way.

Hearing aids repairs: what to know and expect

Even with proper care, hearing aids can occasionally malfunction or wear out over time. Understanding when and how to seek hearing aid repairs can help you avoid long periods without hearing support and prevent further damage.

Common issues include distorted or weak sound, feedback, battery connection problems, or visible damage to components like tubing, domes, or receivers. In many cases, basic maintenance—such as replacing a wax guard or cleaning battery contacts—can resolve the issue. However, if cleaning doesn't help, it may be time for professional repair.

Hearing aid repairs can be done through hearing clinics, audiology practices, or specialized repair shops. Many clinics offer in-house services for minor fixes like replacing domes, receivers, or battery doors. More complex repairs, such as fixing internal electronics, may require the device to be sent to the manufacturer.

If your device is still under warranty, repairs are often covered at no cost. Out-of-warranty services may include diagnostic fees or part replacement costs, depending on the issue and device age.

Some clinics  and hearing aid providers offer hearing aid repair services by mail, allowing you to ship the device and receive it back after servicing. Turnaround times can vary, typically from a few days to a week.

It’s recommended to visit a hearing clinic or provider every 4 to 6 months for routine cleaning and inspection. These visits can help detect issues early and reduce the need for major repairs. With timely care and expert support, most hearing aids can be restored to full function.

Tips for hearing aid troubleshooting

Make sure the hearing aid is turned on. If it uses disposable batteries, check that the battery is inserted correctly and has power. For rechargeable models, ensure they are fully charged and the contacts are clean and dry. 

Blocked sound output is often caused by earwax buildup. Clean the receiver, microphone ports, and vents using a soft brush or wax loop. Replace wax guards or domes if they’re clogged or damaged.

Accidental changes to volume or program modes can affect sound. Use the manual controls or mobile app (if available) to reset settings. Restart the device if necessary.

Examine the device for cracks, loose parts, or moisture exposure. If the hearing aid was dropped or exposed to water, it may need professional repair.

For Bluetooth-enabled hearing aids, try turning Bluetooth off and on, or re-pairing with your smartphone.

Signs of hearing aid malfunctioning to spot

Recognizing early signs of hearing aid malfunction can help you address issues promptly and avoid interruptions in hearing support. Here are the most common symptoms to watch for, according to hearing care experts:

1. No sound or intermittent sound

If your hearing aid suddenly stops producing sound or cuts in and out, it may indicate a power issue, wax blockage, moisture issue or internal fault.

2. Distorted or weak sound

Muffled, fuzzy, or unusually soft sound can be a sign of a clogged microphone or receiver, dying battery, or internal damage to the amplifier or circuitry.

3. Whistling or feedback

Persistent high-pitched whistling may be caused by poor fit, a cracked earmold or tubing, or dome, wax blockage, or microphone problems. Feedback that wasn’t there before is always worth investigating.

4. Battery draining quickly

If batteries (disposable or rechargeable) are depleting much faster than usual, the device may have a short circuit, faulty battery contact, or internal moisture damage. Also if disposable batteries try a fresh package of batteries.

5. Physical damage

Visible cracks, broken tubing, or loose components can directly affect hearing aid function. Moisture inside the case may also cause corrosion.

6. Increased difficulty hearing

If you're suddenly struggling to hear in environments where your aids used to work well, the device may not be amplifying properly or the settings may be off.

If you notice any of these signs, try basic troubleshooting. If the issue persists, schedule a visit to Miracle-Ear for a professional evaluation.

A girl relaxing in the swimming pool

Prevent water damage

Do your best to keep your hearing aid protected from moisture and rain to prevent water damage. Be sure to wipe off your device each day for optimal hearing aid maintenance. Read about how to dry out wet hearing aids in case of excessive moisture. 

More on maintenance

How to care for hearing aids when travelling

Travelling with hearing aids requires a bit of planning to ensure they stay clean, dry, and functional throughout your trip. Whether you're going on a short getaway or an extended journey, the right care routine helps avoid disruptions and damage.

  • Pack the essentials

Always bring a travel-sized hearing aid cleaning kit, including a soft cloth, brush, wax pick, and extra domes or wax guards. If you use rechargeable hearing aids, don’t forget your charger and an adapter if you're travelling internationally. For disposable battery models, pack enough spare batteries for your entire trip.

  • Use a protective case

Store your hearing aids in a hard-shell, moisture-resistant case when not in use. If possible, bring a portable dehumidifier or a drying box to remove moisture overnight—especially helpful in humid climates or after long flights.

  • Clean daily

Stick to your daily routine: wipe the devices with a dry cloth, brush away debris, and check for wax buildup. Keep tools clean and dry.

  • Avoid moisture and heat

Don’t wear your hearing aids while swimming, showering, or using saunas. Keep them away from direct sunlight, heaters, or air conditioning vents in cars or hotel rooms.

  • Be prepared for emergencies

Locate the nearest Miracle-Ear center at your destination in case you need support. Many stores offer same-day repairs or adjustments.

With proper travel care, your hearing aids will continue to provide clear, reliable sound wherever your journey takes you.

How to care for hearing aids when exercising

Exercising with hearing aids is common and safe, but extra care is needed to protect them from sweat, moisture, and physical impact. By following a few simple steps, you can keep your hearing aids in good condition during workouts.

  • Use hearing aid sweat protection

Sweat is one of the biggest risks during physical activity. Consider using sweatbands, hearing aid sleeves, or moisture guards to protect your devices—especially if you do high-intensity or outdoor workouts.

  • Choose the right fit

Make sure your hearing aids fit securely to avoid movement or falling out during exercise. If needed, ask your hearing care professional about sports clips or retention cords that keep your devices in place.

  • Wipe down after workouts

After each session, remove your hearing aids and wipe them down with a dry, soft cloth. Avoid using water or alcohol. Brush away any visible debris or earwax, especially around the microphone and receiver areas.

  • Dry and store properly

Use a hearing aid dehumidifier or drying case overnight to remove any moisture absorbed during the day. This helps prevent corrosion and extends battery life.

  • Recharge and inspect

If you use rechargeable hearing aids, make sure to clean and dry the charging contacts before placing them in the charger. For battery-powered devices, open the battery door to let moisture escape.

With the right precautions, you can enjoy clear sound and full functionality from your hearing aids—even during exercise.

Find the closest Miracle-Ear center

Your store

Get support and advice

Book an appointment online

Book now

Take a free online hearing test

Start test

Find a hearing aid center near you

Search now